
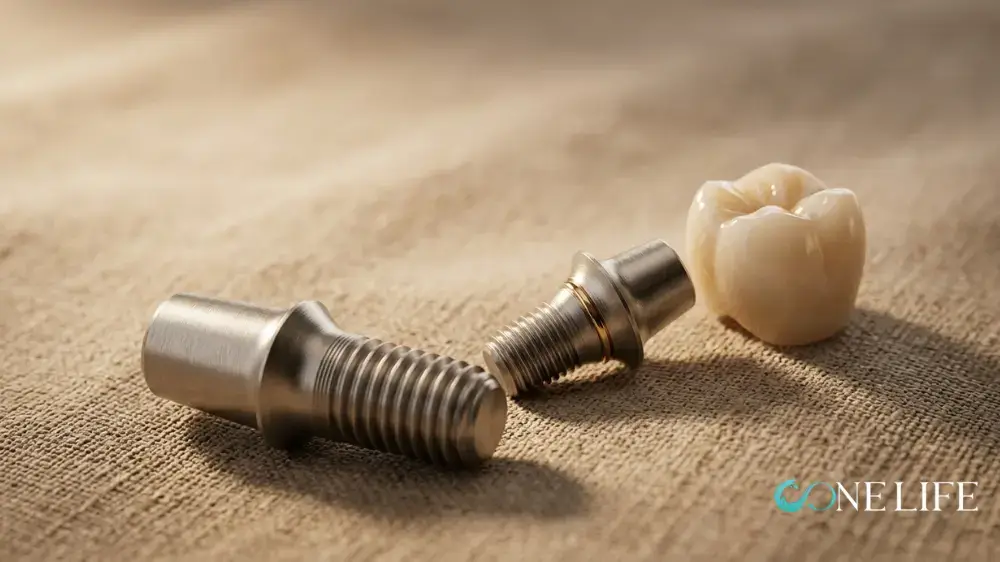
In practice, the dental abutment is one of the more failure-prone components of the implant system. The abutment’s material, for instance (whether titanium, zirconia or gold), will affect everything from how natural your gumline looks, to how long results will last. This article reviewed by Dr. Astolfi walks you through what happens during the placement of an abutment, the procedure steps, all materials and types, guaranteeing the best results.
What Is a Dental Abutment?
A dental abutment is the small connector piece that joins a dental implant to the visible tooth (the crown, bridge, or denture). Without the abutment, there’s no stable way to attach the restoration to the implant post.
The abutment is used across three areas of dentistry. This guide focuses specifically on the implant abutment:
- Dental bridges: where the abutment teeth are the natural teeth on either side of a gap, supporting crowns that anchor a bridge.
- Partial dentures: where abutment teeth use rest seats and guide planes to keep the denture stable.
- Dental implants: where the abutment connects the implant fixture to the crown, bridge, or denture above it.
The Abutment in Dental Implants
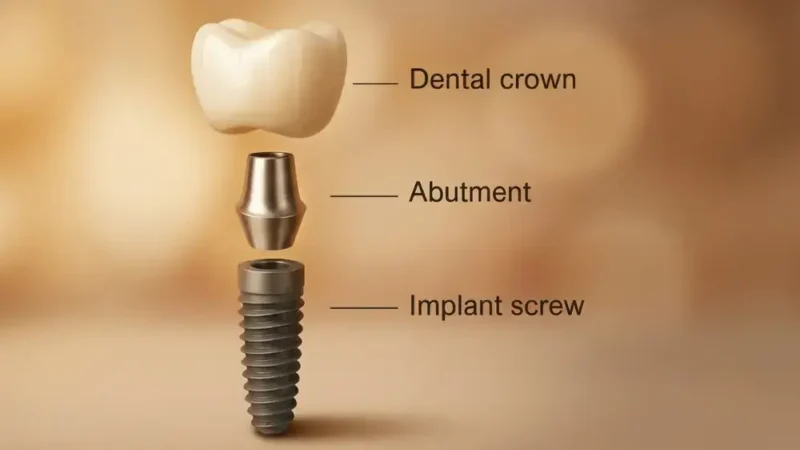
The dental abutment is attached on top of an implant that has fused with the jawbone (a process called osseointegration). This takes place during the second implant visit, typically 3 to 6 months after the first (when the implant is inserted inside the jawbone). The dental crown is then fitted onto the abutment, completing the restoration.
Why Abutment Dental Matters
The abutment’s material, angle, and fit directly shape how natural the final tooth looks and how well it holds up over time. Its design, material, and position directly influence both the long-term function and the aesthetics of the implant. A well-chosen abutment protects the surrounding gum tissue, distributes chewing forces properly, and reduces the risk of loosening.
All Types of Dental Implant Abutments
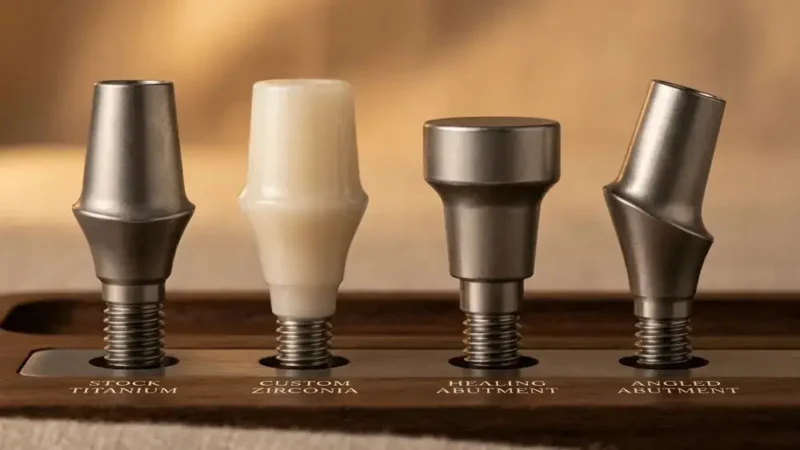
There are five ways to categorize a dental abutment: by healing stage, material, crown attachment method, manufacturing process, and shape. Most patients only need to understand two or three of these to follow their treatment plan. Here’s each one in detail.
1. Healing Abutment vs. Final (Definitive) Abutment
Every implant patient gets a healing abutment (also called a healing cap) before ever seeing their final one.
- Healing abutment (healing cap): Placed immediately after implant surgery; shapes the gum tissue into a natural contour during recovery
- Final abutment: Replaces the healing abutment once gum tissue has matured, usually within a few weeks; permanently supports the crown
2. Titanium vs Zirconia vs Gold Abutment
Abutment material affects both appearance and durability, and it’s usually the first real decision point for patients. The most common materials are:
Material | Best For | Consideration |
Titanium | Back teeth, high bite force | Can show a gray hue through thin gum tissue |
Zirconia | Front teeth, natural aesthetics | Slightly lower mechanical strength than titanium |
Gold alloy | Biocompatibility-sensitive cases | Less common in modern practice |
Titanium-base hybrid | Front teeth needing strength + aesthetics | Higher cost than single-material options |
3. Screw Retained vs. Cement-Retained Abutment
A screw-retained crown is secured with a small screw that passes directly through the crown into the abutment, so a dentist can remove the crown for maintenance without damaging it. A cement-retained crown is bonded to the abutment with dental cement, creating a screw-hole-free appearance that many patients prefer aesthetically.
- Screw-retained: A screw passes through the crown into the abutment. Fully retrievable for future maintenance, but leaves a small (cosmetically filled) hole
- Cement-retained: The crown is bonded to the abutment with dental cement. Great appearance, but harder to remove if problems develop underneath
4. Stock vs. Custom-Made Abutment
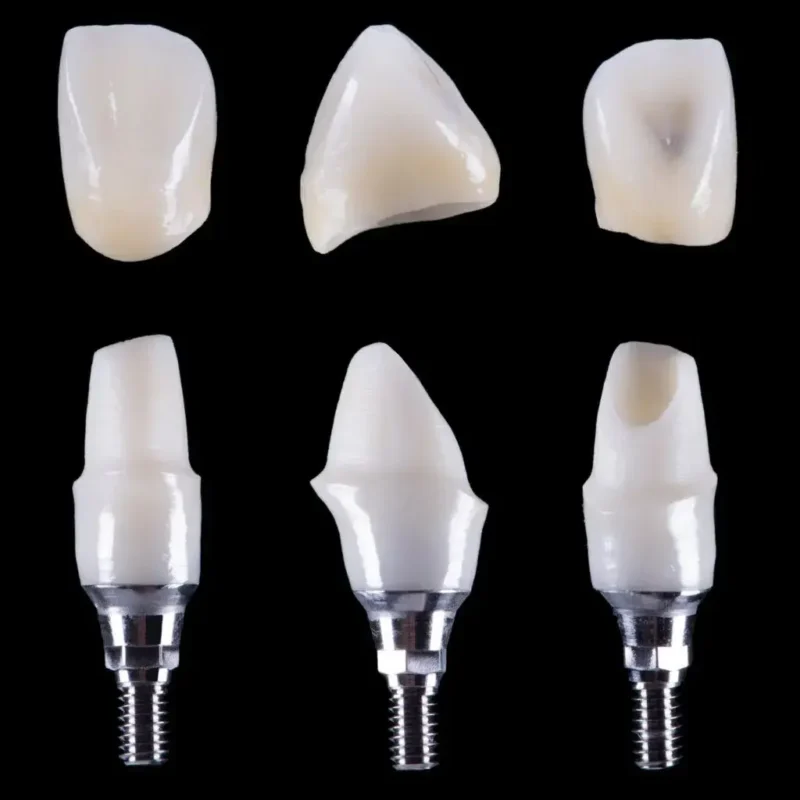
Abutments are also categorized by manufacturing method: stock (prefabricated) or custom (patient-specific).
- Stock (prefabricated): Standardized shapes, cost-effective, used in straightforward cases
- Custom: Designed per patient using digital impressions or CAD/CAM; better fit and emergence profile through the gum, typically used for front-tooth or complex cases
5. Straight vs Angled Dental Abutment
Usually the dentist’s call, not the patient’s. It’s determined by the angle at which the implant was placed relative to the final tooth position.
- Straight: Used when the implant is already aligned with the intended tooth position
- Angled: Corrects the trajectory when the implant sits at a slight angle, avoiding a second surgery
How to Choose the Right Abutment Type
The right combination of these five factors depends on the tooth’s location, the angle of the implant, gum tissue thickness, and personal aesthetic priorities. The table below summarizes the trade-offs:
Factor | Best For | Trade-Off |
Titanium | Back teeth, high bite force | Gray hue risk near thin gums |
Zirconia | Front teeth, natural look | Lower mechanical strength |
Titanium-base hybrid | Front teeth, strength + looks | Higher cost |
Screw-retained | Easy future maintenance | Visible access hole |
Cement-retained | Seamless appearance | Harder to remove if issues arise |
Custom | Complex anatomy, esthetic zones | Higher cost, longer lead time |
Stock | Straightforward cases | Less precise fit |
One-Stage vs. Two-Stage Abutment Placement
One-stage means your abutment goes in on day one; two-stage means it waits three to six months for a short follow-up surgery. Your dentist decides which applies to you based on bone quality and implant stability.
One-Stage | Two-Stage | |
Surgeries needed | 1 | 2 |
Abutment timing | Placed same day as implant | Placed months later, in a second minor surgery |
Best for | Good bone density, stable implant | Lower bone density, need for bone grafting |
Reported success rate | ~94–96% | ~96–98% |
Recovery visibility | Abutment visible above gum during healing | Implant fully covered, invisible during healing |
The Abutment Placement Procedure, Step by Step
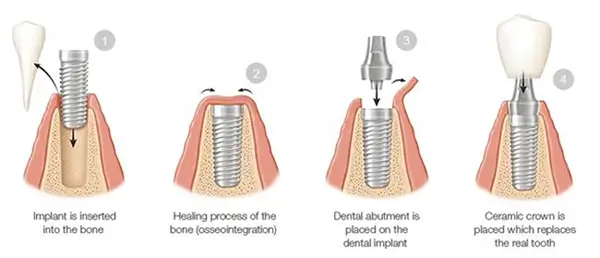
Abutment placement is a short, minor procedure — usually 30–60 minutes under local anesthesia, far less involved than the initial implant surgery. Here’s exactly what happens at each stage.
Before the Procedure: Assessment and Imaging
- X-rays or a CBCT (3D) scan confirm the implant has fully fused with the bone (osseointegration)
- Your dentist checks gum tissue health around the implant site
- Bite and spacing are reviewed to plan the correct abutment angle and height
- You’ll be told whether you need a healing abutment first or can move straight to the final one
During the Procedure
Step | What Happens |
1. Numbing | Local anesthetic is applied to the gum area |
2. Access | If the implant is covered (two-stage), a small incision reopens the gum to expose it |
3. Attachment | The abutment is screwed onto the implant post at a precise torque |
4. Fit check | Your dentist confirms proper seating, angle, and height |
5. Impressions | Digital scans or physical impressions are taken for your final crown |
6. Closure | Gum tissue is shaped around the abutment to heal naturally |
What to Expect in the First 48 Hours
- Mild soreness or gum tenderness — typically manageable with over-the-counter pain relief
- Slight swelling, usually less than after the original implant surgery
- Soft-food diet recommended for the first 24–48 hours
- Normal to feel the abutment with your tongue — it will feel slightly different from a natural tooth until the crown is placed
- Your dentist will schedule the crown-fitting appointment, generally 3–5 weeks later, once the lab completes your custom crown
Abutment Healing Time: How Long Until It’s Ready for the Crown?
Gum tissue around the abutment typically takes 2–3 weeks to heal before your dentist can move forward with your final crown. Here’s the realistic timeline and what to watch for along the way.
Gum Tissue Healing (1–6 Weeks)
Timeframe | What’s Happening |
Days 1–3 | Peak swelling and tenderness; soft-food diet recommended |
Days 3–5 | Discomfort starts decreasing noticeably |
Week 1–2 | Gum tissue closes and shapes around the abutment |
Week 2–3 | Most patients are ready for final impressions |
Up to 6 weeks | Full soft-tissue maturation in some cases, depending on individual healing |
Signs Healing Is Progressing Normally
- Swelling and soreness decrease steadily rather than worsening
- Gums appear pink and firm, not shiny or puffy
- Mild sensitivity when brushing, but no persistent bleeding
- You can gradually reintroduce firmer foods without sharp pain
- The abutment feels stable — no wobbling or shifting
When to Contact Your Dentist
Reach out promptly if you notice:
- Pain that worsens after the first week instead of improving
- Pus, discharge, or a persistent bad taste in your mouth
- Fever or chills
- Bleeding gums that don’t settle with gentle pressure
- A loose or wobbling abutment
- Gum tissue that stays red, hot, or swollen instead of calming down
Long-Term Abutment Maintenance and Care
Abutments need the same ongoing attention as natural teeth… and arguably more. Without regular care, screw loosening and gum inflammation around the abutment become far more likely over time.
Daily Home Care
- Brush twice daily with a soft-bristled toothbrush around the abutment and crown
- Floss or water-floss daily
- Use interdental brushes where gaps make flossing difficult
- Rinse with an antimicrobial mouthwash if your dentist recommends one
Professional Maintenance
- Cleanings every 3–6 months, so your dentist can check for early gum inflammation
- Periodic screw-tightness checks
- Bite and occlusion checks at least annually, especially if you grind your teeth
Risk Factors That Accelerate Wear
Factor | Why It Matters |
Bruxism (teeth grinding) | Clenching forces can exceed 900N, versus 200–400N in normal chewing — significantly raising screw and crown fracture risk |
Smoking | Associated with failure rates roughly 2–2.5x higher than non-smokers at 5-year follow-up |
Skipping cleanings | Nearly half of implant patients may develop peri-implant gum disease within 10 years without regular maintenance, according to the American Academy of Periodontology |
How Much Do Dental Abutments Cost?
A standalone abutment typically costs $300–$550 depending on your country and whether it’s stock or custom,but abutments are rarely priced alone. Most patients see it bundled into the total single-implant fee, which includes the implant fixture, abutment, and crown together.
Remember: One Life Dental offers dental implants in Turkey for a fraction of the price, including full mouth dental implants package deals in Turkey.
Abutment Cost by Country
Country | Abutment Only | Full Single Implant (fixture + abutment + crown) |
🇬🇧 UK | £200–£400 (custom up to £500+) | £1,800–£3,500 |
🇺🇸 USA | $300–$500 (custom $500–$800) | $3,000–$5,000 |
🇨🇦 Canada | ~CAD $400–700 | CAD $1,500–$6,000 |
🇦🇺 Australia | AUD $500–$800 | AUD $3,000–$7,000 |
🇮🇪 Ireland | Broadly in line with UK pricing | €1,800–€3,500 |
🇳🇿 New Zealand | Broadly in line with AU pricing | NZD equivalent of AUD range |
What actually drives the price:
- Material — zirconia and titanium-base hybrids cost more than standard titanium
- Stock vs. custom — custom CAD/CAM abutments typically add $100–$300+ over stock options
- Brand — premium Swiss/Scandinavian systems (Straumann, Nobel Biocare) can add £500–£1,500 to the total treatment versus budget alternatives
- Location — metropolitan clinics generally charge 20–50% more than suburban or regional ones
Best Abutment Dental Brands Compared
Brand | Reputation | Typical Abutment Price Point |
Straumann (Switzerland) | Decades of clinical research, premium tier | ~$185+ (Variobase hybrid) |
Nobel Biocare (Sweden) | Pioneer of modern implantology, premium tier | Comparable premium pricing |
Dentsply Sirona | Strong digital workflow integration | ~$295 (Atlantis custom) |
Osstem / MegaGen / MIS | Mid-tier, widely used internationally | Lower cost, solid clinical track record |
REF Code Authenticity
Every genuine implant component ships with a manufacturer REF (reference) code and LOT number, printed on its sterile packaging and traceable directly back to the manufacturer. This matters more than most patients realize:
- Confirms the abutment is a genuine, manufacturer-certified component — not an unbranded substitute
- Ensures long-term compatibility with your specific implant system
- Provides traceability in the rare event of a manufacturing recall
- Protects your manufacturer warranty
Always ask your clinic to show you the REF code documentation for your abutment before treatment — a reputable provider will have no hesitation providing it.
Potential Risks & Complications of Abutment Placement
Most abutment-related complications are minor and fixable, but they’re more common than many patients expect. Here’s what the research actually shows.
Mechanical Complications
Complication | Reported Rate | Typically Resolved By |
Screw loosening | 8.5%–12.7% of single-implant crowns over follow-up periods | Simple retightening |
Overall mechanical/biological complications | Around 33.6% combined, across a 5-year observation period | Varies by specific issue |
Implant/abutment fracture | Rare — around 1.6% prevalence | Implant removal and replacement (more involved) |
Biological Complications
- Peri-implant mucositis (reversible gum inflammation)
- Peri-implantitis (bone-involving infection): can affect nearly half of implant patients within 10 years if professional maintenance is skipped, per the American Academy of Periodontology
- True infection at the implant site: relatively uncommon, occurring in an estimated 5–10% of cases
What Increases Your Risk
- Smoking: associated with failure rates roughly 2–2.5x higher than non-smokers
- Bruxism (teeth grinding)
- Poor oral hygiene
- Diabetes and other systemic conditions
- Skipping maintenance visits
Key Questions to Ask Your Dentist
The right questions upfront prevent most surprises later, both clinical and financial. Bring this list to your consultation:
About the Abutment Itself
- Which material do you recommend for my case, and why (titanium, zirconia, or hybrid)?
- Will I need a healing abutment first, or can we go straight to the final one?
- Is this a stock or custom abutment — and does that change the price?
- Will the crown be screw-retained or cement-retained, and what are the trade-offs for my specific tooth?
About the Brand and Authenticity
- Which implant/abutment brand and manufacturer will be used?
- Can you provide the REF code and LOT number for my components?
- Is there a manufacturer warranty, and what does it cover?
About Timeline and Cost
- What is the full cost breakdown — implant, abutment, crown, imaging, follow-ups?
- What is the expected timeline from abutment placement to final crown?
- Are there likely to be additional costs (bone grafting, sedation, revisions)?
About Risk and Aftercare
- What’s your experience with cases like mine, and what’s your complication rate?
- What does normal healing look like, and what should prompt me to call you?
- What’s the maintenance schedule you recommend going forward?
Warning Signs: When to See a Dentist?
Most abutment issues are easy to fix when caught early, the key is not waiting. Most of the following are rare, so make sure to contact your dentist promptly if you notice any such signs:
- Persistent or worsening pain, especially after the first week
- Pus, discharge, or a lingering bad tastein your mouth
- Fever or chills
- Bleeding gums that don’t settle with gentle pressure
- A loose, wobbling, or shifting abutment or crown
- Gum tissue that stays red, hot, or swollen rather than calming down over time
- A changed bite: food hitting differently, or your jaw feeling off
- Clicking sounds or discomfort when chewing
- Swollen lymph nodes under the jaw (a sign infection may be spreading)